Ultimate birds in flight workshop and kudos

Snowy Owl FRIGID SUNSET @ -34℃ (Bubo scandiacus, Harfang des neiges, SNOW) Ontrario. Image Copyright ©Christopher Dodds. Canon EOS Canon EOS 1DX, 600mm F4 L IS II, 1.4X Extender III, Jobu Jr. 3 and Jobu Designs Algonquin Tripod ISO 2,000, f/5.6 @ 1/2,500s Manual mode. PURCHASE A PRINT or LICENSE IMAGE FOR PUBLICATION HERE.

It's been a whirlwind of a year so far, with eight weeks of sold-out owl prowls and three weeks of sold-out Bald Eagle workshops under my belt so far ... and it's only April 1. I have had an awesome year so far, and it's only just begun!

Here's a Snowy Owl from one of the coldest days of the winter, in some of the sweetest light. There are still a few (only a few) openings for my 2015 owl prowls ... have a look HERE

The Ultimate Birds in flight Workshop

If you want to attend the premier workshop to learn bird photography, then this is it. There are birds to photograph all day long, thousands at point-blank range. I stopped counting after spending more than a year of my life on Bonaventure Island, have an intimate knowledge of the location, the subjects and the people (we often get special privileges, among them is the park transporting our gear up to the colony each day).

I have hosted hundreds of workshops on Bonaventure Island and my record stands for itself. Simply put; if you want to master birds in flight photography, then this is the workshop for you.

Read more about my Gannets Galore workshop HERE

I attended Christopher Dodds’ “Gannets Galore” workshop in Perce, Quebec, Canada. I have attended many wildlife photo workshops over the years and this workshop was a 10+ without a doubt. The trip was exactly as he described on his web site; no overpromising and under delivering.

Chris provided access to a colony of 63,000 nesting pairs of Northern Gannets (and at least as many non-breeding birds) and his relationships with the local park staff allowed us to get to locations in the park that were closed to the public.  Throughout the trip he was cheerful, very well organized and took care of all  those details (and this was a complicated location) that can ruin an experience..  I was able to concentrate on what I came to do…..photography. 

As a professional photographer I know my field, but it is a major bonus to find someone who can provide instruction to me.  My flight shots improved dramatically!  Chris has an uncanny understanding of composition and light and presented me with many opportunities to test my skills.  He understands creativity in photography as well as being a technical master. This trip was perfect for a beginner or a professional and he gives as much instruction and guidance as you need without arrogance, attitude or making you feel too shy to ask.  I would encourage any photographer, no matter what level,  to sign up for Chris' workshops."

Terry Turrentine San Francisco, California USA

Testimonial

Winter owl photography was near the top of my bucket list.  My research kept ending up with one name, Christopher Dodds.  I had participated in nine previous field instructional photo tours throughout the USA, Canada, Japan and the Falklands with six different professional photographers all of which were excellent but this one was a cut above.

The best field photography instructors are professionals, formally trained in photography and have extensive experience in studio work as well as other areas.  Chris Dodds comes with those credentials and 20 plus years as an outdoor photographer and is a sub specialist in winter owl photographyHe understands and teaches from the basics to the most advanced science and technical knowledge in the field.

Beyond the photography Chris’ Owl Prowl stands out as the model for a highly successful experience.  After 20 plus years of developing relationships and infrastructure his photo tours are characterized by superb organization, logistic, transportation, and communication.  We stayed on schedule at a relaxed pace and he was always mindful of our small group's personal safety during extreme weather conditions.

The return on my investment and expectations in Chris Dodds' Great Owl Prowl was excellent.  It's true! you get what you pay for.

CJ Hockett Vermont USA www.cjhockett.com

2015 Bald Eagle Workshops announced and Kudos

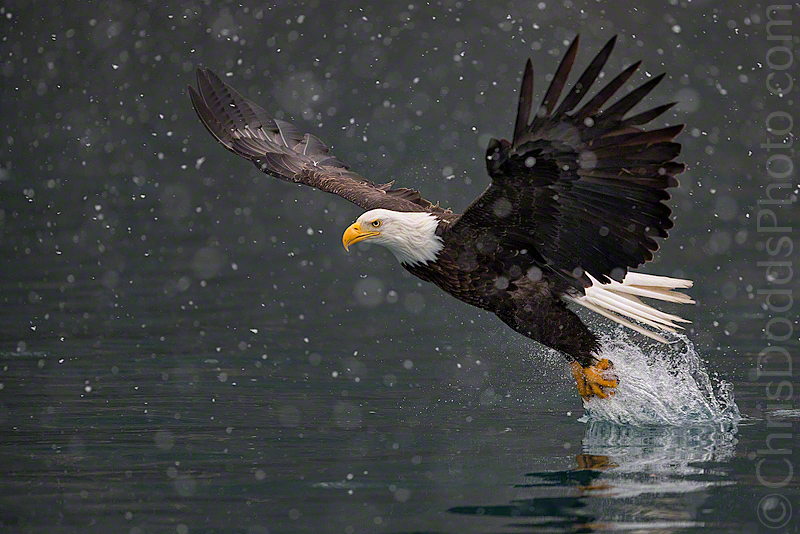
American Bald Eagle SNOWGLOBE (Hailiaeetus leucocephalus, Pygarge a tete blanche, BAEA) Kachemak Bay (near Homer), Alaska ©Christopher Dodds All Rights Reserved. Canon EOS 1DX, EF 200-400mm F4 L IS USM with Jobu L-Bracket  Jobu Jr.3 deluxe gimbal head and Jobu Designs Algonquin Tripod ISO 6,400, f/4 @ 1/3,200s Manual mode. Click HERE to order a print or license image for publication.

Here's one of many new Bald Eagle images added to my portfolio during my three recent back-to-back Bald Eagles Photo Tours. There were no shortage of amazing opportunities for everyone who attended and my site knowledge over the years took us to many new bays and private beaches which we had exclusive permission to use.

I used my Canon EF 200-400mm f/4 with built-in 1.4X extender almost exclusively during this year's trips; what a lens! Expect a mini-review soon, but suffice it to say it is one mind-blowing lens!

My 2015 Bald Eagle Photo Tours are starting to fill, so be sure to book early to avoid disapointment! Learn more about my Eagle workshops HERE.

Testimonial

I just got back from a 10 day trip to Homer, Alaska., the place to shoot the majestic Bald Eagle. My host was Christopher Dodds and what a host he has been. He gave the 2 groups I joined a lot of field time and put us in the best positions to take epic shots every single day. There are others out there but Chris has been doing this for more than 25 years so I think it’s justified to call him the primus inter pares. A great workshop leader, excellent photographer, teacher and above all a really nice guy. If you ever consider shooting Bald Eagles and get the best for your money go see Chris , he will not disappoint you.

Dennis Binda The Netherlands

Jobu Designs Algonquin Tripod Announced and mini review

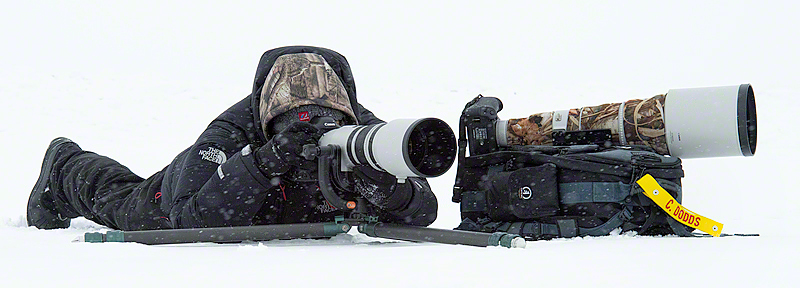
Canadian Wildlife and Nature Photographer and Canon Northern Explorer of Light Christopher Dodds photographing owls in the Canadian winter (Feb,. 2014). Photographed with a prototype of the new Jobu Designs Algonquin tripod, Jobu Jr.3 deluxe gimbal head, Canon 200-400mm f/4-5.6 with built-in tele-extender, 600mm f/4 IS L II, Tamrac Expedition 9X camera bag and two Canon EOS 1DX camera bodies. Photo copyright and courtesy of Michael J. Lang (thanks, Michael)

Jobu Designs Algonquin Tripod

I have spent the better part of the winter testing prototypes of the new Jobu Designs Algonquin tripod and am thoroughly impressed with it's solid and reliable design. I make no secret of the frustrations that I have felt working with a variety of very expensive carbon fiber tripods over the years. None of the ones I have used worked reliably in the extreme temperature fluctuations and harsh conditions that I often subject them to. The weak point often being the collar that tightens and locks the leg at the chosen height. I have even experienced one manufacturer throw my tripod in the trash when it was still covered under warranty, stating it was abused and therefore not covered under warranty; not bad for a $1000.00 tripod!

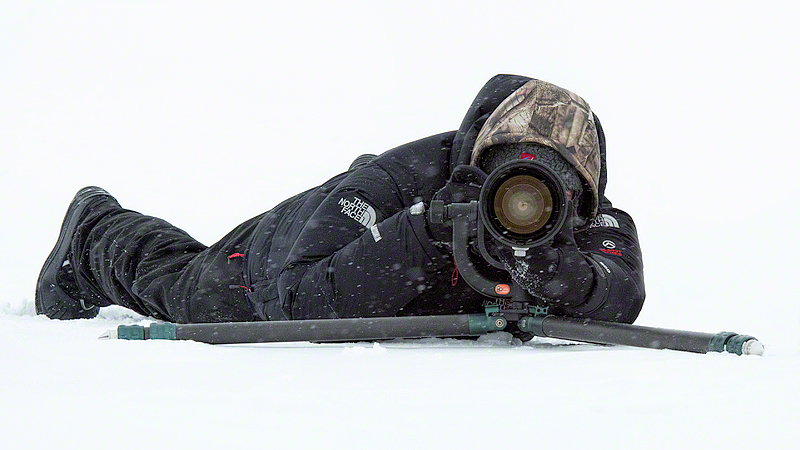
Finally a tripod that is designed for nature photography! The Jobu Algonquin tripod has worked flawlessly during my extreme testing in the winter conditions in temperatures as low as -34℃ (-29℉). When I was sent the first prototype, I was warned it would be a rough, mill finish sample and asked to "give it hell". When I received the prototype, it was a beauty; much, much nicer than I had expected. After just one session in the cold with the new tripod, I was impressed and hooked! After most of the winter working with it, I can endorse it! Paired with my beloved Jobu Jr. 3 Deluxe Gimbal head, it is one killer rig! I am proud to have been part of it's design and testing.

The tripod adjusts from 3-3/4" (9.5cm) to 62" (157.5cm) and is 27.7" (70.6cm) long when collapsed. It's current weight is 4 pounds (1.81kg) , but this may change slightly during production. The leg sections are made of 100% carbon fibre without the usual filler or cosmetic wrap (which actually weakens the integrity of the tube) and each of the legs has a foam leg cover built-in. The leg collars (the knobs that tighten to secure each leg section at the desired length) are made of Aluminum without the rubber grips that often spin endlessly in the cold. The feet are stainless steel snow/ice spikes with a rubber foot cap that stays securely in place when the spikes aren't necessary; a great design advantage.

Be amongst the first to order your Jobu Design Algonquin tripod and get a special introductory price is $600.00 with an expected delivery of 4-6 weeks. Order yours here: http://jobu-design.3dcartstores.com/product.asp?itemid=122

Canadian Wildlife and Nature Photographer and Canon Northern Explorer of Light Christopher Dodds photographing owls in the Canadian winter (Feb,. 2014). Photographed with a prototype of the new Jobu Designs Algonquin tripod, Jobu Jr.3 deluxe gimbal head, Canon 200-400mm f/4-5.6 with built-in tele-extender and Canon EOS 1DX. Photo copyright and courtesy of Michael J. Lang (thanks, Michael).

How to make razor sharp images


American Bald Eagle ATTITUDE (Hailiaeetus leucocephalus, Pygarge a tete blanche, BAEA) Kachemak Bay (near Homer), Alaska ©Christopher Dodds All Rights Reserved. Canon EOS 1DX, 300mm F2.8 L IS USM with Jobu L-Bracket  Hand Held ISO 2,000, f/2.8 @ 1/3,200s Manual mode. Click HERE to order a print or license image for publication.

After spending the first day of this week's Snowy Winter Owl Workshops with numerous Snowy Owls in rather balmy weather conditions, I wanted to re-cap one of the important topics that we discussed: How to make razor sharp images. I often get comments about how sharp my images are, and folks often feel there is a secret to making consistently sharp images. While good field craft and techniques do play a major role in making sharp images, you need to start with a solid foundation. Yes, I do use a tripod whenever possible, I ensure I have enough shutter speed to freeze my subject and have the correct parameters set-up in the user menu of my Canon 1DX. I have invested the time to practice, and can consistently acquire fast moving little birds when I bring my eye to the viewfinder; but my answer trumps all of my years of experience and the best technique.

Each and every time that I get a new camera, I meticulously micro-calibrate each, and every, lens, extender and possible combination or both with my LensAlign MKII. This is time consuming, boring and I hate the whole process, but it tightens the manufacture tolerance and ensures that my images will be sharp if I use proper technique. It's like building a house on a solid foundation.

Read more about the LensAlign MKII HERE

Canon announces new pro camera body

Juvenile American Bald Eagle WINTER'S FLIGHT (Hailiaeetus leucocephalus, Pygarge a tete blanche, BAEA) Kachemak Bay (near Homer), Alaska ©Christopher Dodds All Rights Reserved. Canon EOS 1DX, 300mm F2.8 L IS USM with Jobu L-Bracket  Hand Held ISO 2,000, f/2.8 @ 1/3,200s Manual mode. Click HERE to order a print or license image for publication.

Here's a juvenile Bald Eagle from last year's epic Bald Eagle workshop. There are still a couple of spots available for this trip of a lifetime from March 7-11, 2014. Both March 12-16 and 17-21 trips are sold-out. Learn more and sign-up for my Bald Eagles of Homer, Alaska Workshop HERE.


Canon announces new pro camera body

Well, not really a new pro camera body, but this firmware update sure will make the already awesome 1DX feel like a brand new camera - and it's a free upgrade!

Canon has released a firmware update for the EOS-1D X Digital SLR Camera.
Details
Firmware Version 2.0.3 incorporates the following functional improvements and fixes.

  • Auto focusing performance under low-light conditions has been enhanced when performing focusing before shooting in AI Servo AF mode. The enhancement comes from the improvement in tracking capability for the first image in the low-light conditions.
  • The number of release parameters settings for the “AI Servo AF 2nd image priority” AF function has been increased to enable improved AF tracking in low light or maintain consistent high frames rates during continuous shooting.
  • The number of parameters for acceleration/deceleration tracking in the AF Configuration Tool will has been increased.
  • Exposure compensation can be performed when using manual exposure and ISO Auto.
  • The minimum shutter speed limit for ISO Auto has been increased with shutter speeds up to 1/8000.
  • A new function to keep the exposure constant by altering the ISO or shutter speed in manual exposure, when the aperture value changes when zooming or changing lenses has been added. This is an awesome and very useful feature!
  • A new option has been added to orientation linked AF point to enable only the AF point to switch as you change orientation rather than both AF point/ AF area settings
  • A new option to continue to use the previously manually selected AF point as the initial starting AF point when switching to 61-point automatic selection has been added.
  • New customization of the Exposure metering and AF controls has been added for more flexibility.
  • The number of possibilities for controls to switch between one-shot AF and AI Servo AF using custom controls has been increased.
  • A function has been added to allow the playback and review of protected images only.
  • A phenomenon has been fixed in which the white balance may be disturbed by the timing of the shutter release when the drive mode is single shooting and a flash (E-TTL)is used.

This update truly makes an amazing camera even better. The update arrives at a time when many were expecting a new camera announcement and continues Canon's recent trend of offering substantial free firmware upgrades for current camera models and incorporating user feedback.

DOWNLOAD Firmware version 2.0.3 for the 1DX HERE

DOWNLOAD Updated users manual HERE Always a good idea to keep a PDF on your smartphone for reference

Read the Canon product advisory HERE

Happy New Year

Great Grey Owl WINTERWINGS  (Strix nebulosa, Chouette Lapone, GGOW) Gatineau, Quebec ©Christopher Dodds All Rights Reserved. Canon EOS 1DX, 500mm f/4 L IS USM. ISO 2,500 f/5.6 @ 1/2,000s Manual mode. Click HERE to order a print or license image for publication.

HAPPY NEW YEAR

Here's to a phenomenal 2014 filled with much health, love, joy, light, adventure and tons of awesome images! 2013 was like a dream for me, and I thank you all for making my dreams come true!

Facebook Fan Page

If you like the images presented here, do stop-by and "LIKE" my Facebook fan page to see more content: https://www.facebook.com/chrisdoddsphoto

Merry Christmas Happy Holidays Thank You

Great Grey Owl SOLITUDE (Strix nebulosa, Chouette Lapone, GGOW) Gatineau, Quebec ©Christopher Dodds All Rights Reserved. Canon EOS Canon EOS 1DX, 70-300mm F4-5.6 L IS USM @244mm with Jobu L-Bracket  Hand Held ISO 3,200s, f/5.6 @ 1/2,500s Manual mode. Click HERE to order a print or license image for publication.

Merry Christmas, Happy Holidays, Peace, Joy & Love

To everyone who visited this blog or my Facebook page, attended a workshop, safari, seminar or lecture, purchased a print or licensed an image: Thank you for making 2013 my best year yet. I am so very lucky and grateful!

Better than Bosque and Workshop Woes

Sandhill Crane SUNSET FLIGHT  A Sanhill Crane lands against the pink, snow covered Sandia Mountains in golden fields (Grus canadenis, Grue du Canada, SACR) NOT from Bosque del Apache, New Mexico ©Christopher Dodds All Rights Reserved. Canon EOS 1DX, 600mm f/4 L IS USM II & 2X III Extender with Jobu L-Bracket and Jobu Jr. 3 Deluxe  ISO 2,000, f/8 @ 1/1,600s Manual mode. Click HERE to order a print or license image for publication.

Better than Bosque?

Is Bosque del Apache National Wildlife Refuge over-rated? Perhaps it's just me, but I feel the offerings there for Snow Geese and Sandhill Cranes are far surpassed elsewhere. Don't get me wrong, there are still some awesome opportunities for raptors, ducks and other birds, it's just I feel the hype about Bosque is no longer justified. I'm just back from a nine day trip in the area and only visited Bosque for three sessions, the remainder of our time was spend exploring the surrounding opportunities…. and we hit the pot of gold! I'm in the process of listing a "Better than Bosque" workshop for Dec. 1-5, 2014 so please email me if interested ASAP(chris(at)chrisdoddsphoto.com); there's loads of interest and this will fill very fast. Group size limited to six and we will be based in Socorro, NM. We'll be visiting Bosque when the conditions are right, but our mission is to make the very best images possible; and we'll be visiting several over-the-top spots to do it!

Workshop Leader Woes

While in Bosque, I encountered a few workshops that I just plain need to vent about. Group size varied from 8 to 18 and the lack of fieldcraft and/or knowledge was blatantly evident! Perhaps the participants wanted to go and hang-out for the lowest possible price, or perhaps they signed-up for the first workshop they saw on-line, I dunno; I was simply shocked. I saw workshop leaders prance around like they were royalty, pull-up in front of other photographers and spook fields full of Cranes without even realizing it and I overheard so much gossip and belittlement of other leaders, yet no useful photographic information about composition, exposure or anything else that the participants joined the workshop for. All of the groups went to the same locations to shoot and none of them showed any sense of doing anything different. There were workshops that advertised small groups (they were 18 people - just imagine how much time is wasted with logistics) and leaders who I overheard say "exposure and technical ability is over-rated, just follow your heart and vision" while this sounds romantic, it was clearly a new leader in way over his head when asked how to reliably make well exposed images.

If you would like to experience a small group (max. 6) workshop focused on teaching you how to make better images without the nonsense, then please do check-out my WORKSHOPS and read some TESTIMONIALS. I truly feel I haven't succeeded unless my clients make images that I would be proud to call my own, and work tirelessly to that end! Do join a workshop for the right reason; join because you like my images and want to learn how I make them - if you don't like my images (and that's alright), then email me and I will send you a list of other workshops by other people to consider (many are much cheaper, but expect what you pay for).

Great Grey Owl GEAR DOWN

Great Grey Owl GEAR DOWN  (Strix nebulosa, Chouette Lapone, GGOW) Quebec ©Christopher Dodds All Rights Reserved. Canon EOS 1DII, 100-400mm f/4.5-5.6 L IS. ISO 400, f/6.4 @ 1/650s Manual mode. Click HERE to order a print or license image for publication.

I had a fabulous short visit to Halifax, NS to present my Canon Northern Explorers of Light slideshow to the Photographic Guild of Nova Scotia last Friday. The hospitality was first rate and the East Coast crowd was fabulous. Here's a note that I received after the event:

I just wanted to drop you a line in appreciation of your presentation Friday night in Halifax. From my perspective, of all the Canon Northern Explorers of Light, the Guild struck it lucky when it succeeded in recruiting you for a talk. The images you showed were terrific, but it was your interest in and knowledge of your subjects that made the event so worthwhile - captivating, in fact. No wonder you're a popular workshop and field instructor. Your enthusiastic engagement with the natural world is inspiring.

All of which is to say I enjoyed your presentation and I was glad of the opportunity to attend.

Kindest regards,

Betsy Chambers Halifax, NS, Canada

Perfect Gift for Bird and Nature Photographers

Great Grey Owl Tranquil Winter  (Strix nebulosa, Chouette Lapone, GGOW) Gatineau, Quebec ©Christopher Dodds All Rights Reserved. Canon EOS 1DX, 300mm f/2.8 L IS USM with Jobu L-Bracket and Jobu Jr. 3 Deluxe  ISO 1,600, f/6.4 @ 1/2,500s Manual mode. Click HERE to order a print or license image for publication.

I get almost more emails than I can imagine, and a good number of them lately have been from people wondering what to get the special bird or nature photographer in their life. So, without hesitation, the ultimate accessory for every nature photographer is, without doubt, the Jobu Jr. 3 with Deluxe swing-arm from Jobu Designs.

The PERFECT Gift

I have been using the Jobu Jr.3 since I first told you about it in April 2011 HERE. Then I told you of the long awaited design improvements to the swing arm when I announced the Deluxe Swing Arm upgrade HERE in August 2012. Now I am delighted to announce that Jobu Designs is offering FREE SHIPPING (Canada & USA) AND 15% OFF your entire purchase as a special for the followers of this blog. Simply use the coupon code NATURE at the check-out when placing your order at the Jobu Designs site HERE. This is a limited time offer, so do hurry to place your order and take advantage of this great offer.

This is the only Gimbal tripod head that I have used since I first installed it on my tripod; it supports all of the big glass that I use (300, 500, 600 and 800mm), ensures fluid movement and most importantly, it is super light weight and it's compact size is easy to carry in the field and pack in a world where airlines love to restrict luggage weight and size.

Follow the link HERE and be sure to use the coupon code "NATURE" while at the check-out to save 15% and get FREE SHIPPING to Canada & USA.

Canon Northern Explorers of Light Presentation in Halifax

Great Grey Owl OLD MAN WINTER  (Strix nebulosa, Chouette Lapone, GGOW) Gatineau, Quebec ©Christopher Dodds All Rights Reserved. Canon EOS 1DX, 500mm f/4 L IS USM with Jobu L-Bracket and Jobu Jr. 3 Deluxe  ISO 3,200, f/4 @ 1/3,200s Manual mode. Click HERE to order a print or license image for publication.

Here's one from a very cold and windy day during last winter's Winter Owl Prowls. There is still two spots available for the winter 2014 season - more information about my Snowy Winter Owl Photographic Expeditions HERE

HELLO HALIFAX

I'm thrilled to announce yet another Canon Northern Explorers of Light event. On Friday, November 22, 2013 at 7:30PM I will be presenting to the Photographic Guild of Nova Scotia. Everyone is welcome and I hope to see you there if you are around the Halifax, Nova Scotia area next Friday evening. Lots of great door prizes and tons of valuable photo techniques!

Tickets are $15.00 at the door and only $10.00 if you order them in advance from Dean Hirtle tresurer@photoguild.ns.ca Get yours now to avoid disappointment.

Get more information HERE.

Canon imagePROGRAF iPF6400 review

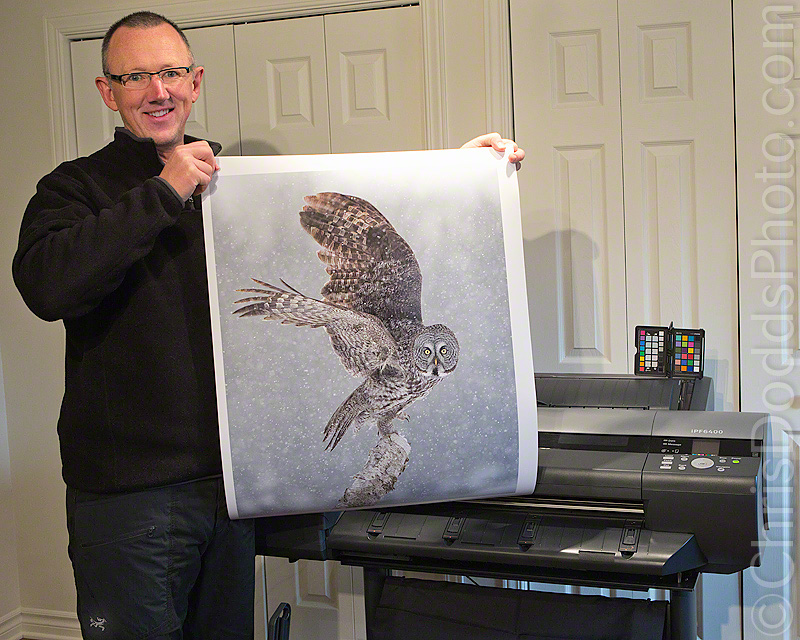
World Wildlife Photographer and Canon Northern Explorer of Light Christopher Dodds with Canon imagePROGRAF iPF6400. There's nothing like seeing a big print of one of your favorite images! Notice the X-Rite Colorchecker Passport in the background to help with color accuracy.

Canon IPF6400 Review

As a master printer in the traditional darkroom, I've been working hard over the last decade to master the art of the digital print; often struggling to squeeze every ounce of colour gamut out of the printer and paper I was using. I have owned more inkjet printers than I care to admit, and have spent an inordinate amount of time finding workarounds to each of their weaknesses. My quest to make the very best print has been a very long and often  frustrating journey.

It's no secret that I'm a perfectionist; I push myself to be better at my passion and craft each and every time I am out with my camera; from capture through to the print. I don't feel the image is finished until I have experienced the big picture; my own tactile response to my own work is, perhaps, the most rewarding part of the image making process to me.

Canon Canada sent me their flagship 24" Image PROGRAF IPF6400 printer back in August and I have been to the Canon LFP (Large Format Printing) Lab in Toronto for some training and product familiarization by some of the best in the business. I want to share a little about the printer with you, without re-writing the technical specification sheet (which can be found HERE); I wanted to write a hands-on review of the printer, it's extraordinary colour gamut, ease of use and the masterful prints it creates; Let's just say I have been blown-away by my first Canon LFP; this is an industry changing printer that truly is a turn-key solution for excellent prints without needing to be an expert print maker. I have finally found the perfect printer!

The unboxing and set-up was quick and easy, thanks to the single page set-up instructions. The included stand with built-in wheels makes it easy to move out of the way when not in use. The design is well though-out, with built-in paper bin and it certainly looks great in the studio/office.

The included software is, quite frankly, brilliant and easy to install and use; Canon was wise to develop a dedicated plug-in for Photoshop to facilitate easy 16 bit printing and a stand-alone software to manage print media called the MCT (Media Configuration Tool). The MCT allows you to add both custom and Canon paper types which will appear on the printer's LCD display when loading new media. Canon has made it easy to find profiles for their media HERE and compatible third party papers HERE.

The included ImagePROGRAF Layout Plug-in includes some pretty useful tools to minimize paper waste. If you print canvas and make gallery wraps, then the image expansion tool does a fabulous job of easily extending the edge of the image along the sides with choices that include black border, soft (or blurred) reflection; minimizing image loss during the wrapping process.

As a Mac user, I was disappointed to learn that the Accounting Manager was only available for the Windows platform; though more out of curiosity than needing to know the exact job cost (ink & media). This is much more useful to a print production house than a fine art studio - If you are a photographer trying to calculate exact print costs, then you are most likely not charging enough for your work!

The industry leading 12-color Lucia EX ink offers the widest colour gamut, finest detail and best print quality I have ever seen. The built-in sub-ink tanks built into the printer allow you to change ink tanks without interrupting printing and the new 330ml replacement tanks are a welcome change when doing large print runs.

The new PF-05 printheads have eliminated both clogging and banding; this, alone, is worth the investment. Optimized for speed and ink savings, the driver maintains the highest print quality while reducing ink use by ensuring fewer print head passes; resulting in a much faster print time.

Available features, upgrades and other models:

iPF 6450 - 24" Printer with built-in hard drive and optional X-Rite SU-21 spectrophotometer with automatic colour calibration and colour accuracy across multiple printers and multiple geographic locations.


iPF 8400 - 44" Printer


iPF 9400 - 60" Printer

Because these printers all use the same ink, print heads and mechanics; this review is relevant to them all.

Here is an overview of the printer from the Canon website:

The imagePROGRAF iPF6400, 24-inch large format printer was designed for professionals in the graphic, fine art, photography and proofing markets that seek the highest possible standards for quality-control and image reproduction. An incredibly large color spectrum is produced by the 12-Color LUCIA EX pigment ink set, which also provides better scratch resistance and smoother gradations. The new Multi-sensor included with this printer provides improved color density detection and allows for a full calibration to be completed within 15 minutes, with the ability to use non-Canon branded media. A new Color Calibration Management System allows for color calibration targets to be created using the iPF6450 with optional spectrophotometer and shared across all new iPFX400 12-color printers, and the included software allows for all printers on the network to be monitored from one central location. The printer supports ink tank sizes of 130ml and for the first time, 300ml, and the new sub-ink tank keeps some ink in reserve to allow for tanks to be changed without interrupting a print. In highest print mode, the order of ink application and layering is optimized to maintain the highest print quality with fewer passes, making this mode twice as fast compared to previous models.

To expand printing options and capabilities, the iPF6400 printer comes bundled with a Print Plug-in for Adobe Photoshop, Digital Photo Professional, and Microsoft Office. The enhanced Print Plug-in for Adobe Photoshop includes a new Adjustment Pattern Setting which allows for multiples of an image to be printed at once with different color values implemented and displayed. Gallery wraps for canvas prints can now be created using the new Gallery Wrap Feature. To improve versatility, the iPF6400 has a media configuration tool which allows customers to not only utilize existing Canon-branded media, but also with third party media. Designed for efficiency, reliability, and above all quality, the iPF6400 is the professionals answer to superior quality large format prints.

Disclaimer: I am a Canon Northern Explorer of Light; paid and sponsored by Canon Canada. I do not write reviews of products that I do not use every day, and do not endorse products in lieu of sponsorship or payment. This review and endorsement is strictly my personal view.

Bald Eagle Photo Tour update

American Bald Eagles HOT PURSUIT (Haliaeetus leucocephalus, Pygargue à tête blanche, BAEA) Kachemak Bay, Alaska ©Christopher Dodds All Rights Reserved. Canon EOS Canon EOS 1D MKIII, 500mm F4 L IS, 1.4X Tele-Extender, Tripod & Jobu Jr. 3 ISO 1,250, f/5.6 @ 1/1,2500s Manual mode. PURCHASE A PRINT or LICENSE IMAGE for PUBLICATION HERE.

Bald Eagle Photo Tour Update

Just a quick note today to let you know that both of my Bald Eagle Photo Tours are sold out; Thank you! I have added a third Bald Eagle Photo Tour from March 7-11, 2014 which has only 4 seats left. If you are looking to build an awesome portfolio of Eagle images and love a little adventrue, then this is the trip for you. Read all about my Bald Eagle Photo Tour HERE.


Chris, Thanks for another great photo adventure to Alaska during your Eagles of Alaska photograpic Expedition!!!!!!
This is the third trip with you and they keep getting better. Always challenging. Always easy-going. Always taking my photography forward. (Take a look at my site for a few new pictures from Alaska.) Your instruction is the best I've experience in taking these kinds of trips. You always seem to know where to put us in the absolute best place. Top Notch!!!! Can't wait till the next one.....wherever that might be. Thanks again!!!!!!!  

Jeff Moore Arlington Heights, Illinois, USA

Be sure to check-out many more TESTIMONIALS HERE

Bat Photography Workshop Announced


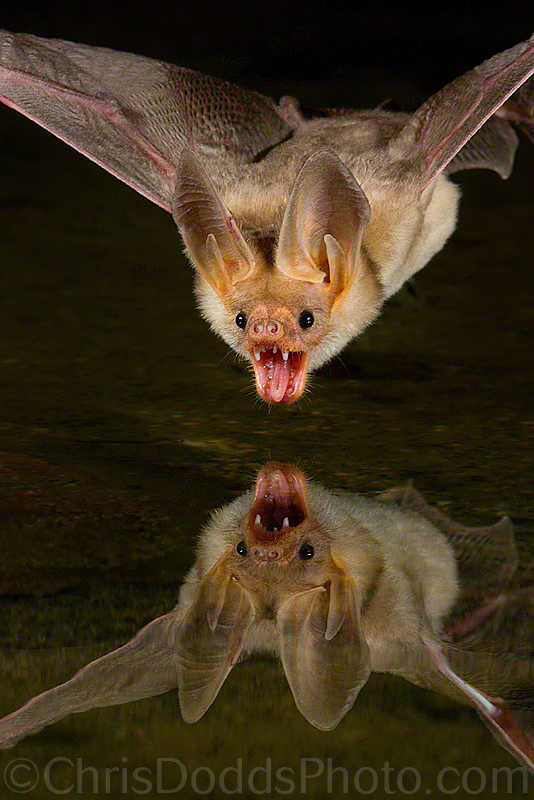
Pallid Bat THIRST (Antrozous pallidus Chauvre-souris blonde) Amado, Arizona, USA. Image Copyright ©Christopher Dodds. Canon EOS Canon EOS 1DX, 600mm F4 L IS II, Canon 2X Extender III, Tripod & Jobu Jr. 3 Photo Trap and four flash set-up. ISO 400, f/16 @ 10 second exposure in Manual mode. PURCHASE A PRINT or LICENSE IMAGE FOR PUBLICATION HERE.

Here's a Pallid bat from my recent trip to Arizona. Pallid bats have the some of the largest eyes of the North American bats and their large ears help them hear the footsteps of the insects they hunt for food. Be sure to check-out my last post, HOW TO PHOTOGRAPH BATS WITH THE PHOTOTRAP to learn how I set-up exposure for this image.

2014 High-speed Bat Photography Workshop

September 9-11, 2014 (3 full Days)

September 12-14, 2014 (3 full Days)

Join me, Christopher Dodds, at "The Pond at Elephant Head" for an incredible high-speed bat photography workshop. Bats are some of the most misunderstood creatures on earth and there aren't many photographers out there photographing them. I've designed this workshop with only three participants and have enlisted the help of Phototrap inventor, Bill Forbes, to ensure you get the images I would be proud to call my own. Learn how to use the Phototrap and high-speed flash photography to create stunning action images on your own.


This workshop includes the use of all of the required high-speed flashes and Phototraps, and you don't need the latest or greatest super duper telephotos to make stunning jaw-dropping images! Amazing images can be made with every focal length from 100 to 1,200mm! Having two camera bodies will be useful to work two set-ups at the same time, but lenses like 70-200, 70-300, 100-400, 200-400, 50-500, 300, 400, 500 or 600mm all work well here. You will need a tripod and a remote release which can be set, or locked, in the on position so the camera will continue to fire when set to continuous mode.

This workshop is highly recommended for any level photographer. Whether you are completely new to nature photography, an experienced amateur, or a seasoned pro. There will be something to photograph and we will have plenty of time to tailor your instruction to your abilities. The seasoned pro can take full advantage of the logistics, my site and subject knowledge. Even if you have no desire to learn the technical side of this type of shoot, and simply want to come home with some fabulous images, then we can take care of your set-up for you!

Learn More about the High-speed Bat Photography Workshop HERE


How to photograph bats with the PhotoTrap

Big Brown Bat Drinking from a pond (Eptesicus fuscus, Grande Chauvre-souris brune) Amado, Arizona, USA. Image Copyright ©Christopher Dodds. Canon EOS Canon EOS 1DX, 600mm F4 L IS II Tripod & Jobu Jr. 3 Photo Trap and four flash set-up. ISO 400, f/16 @ 10 second exposure in Manual mode. PURCHASE A PRINT or LICENSE IMAGE FOR PUBLICATION HERE.

I'm back from hosting a five day private workshop to Amado, Arizona where we set-up to photograph bats drinking from The Pond at Elephant Head with Phototrap inventor Bill Forbes.

Among our projects, we set-up the photo trap's infra-red beam to trigger a four flash array to illuminate the bats as they skimmed the pond to drink at night. We arranged our cameras for the best angle of view, the four flashes to properly light the subjects and adjusted our manual exposure to f/16, ISO 400 at 10 seconds. Once set-up, we installed our intravalometers which engaged the shutter release to continually take ten-second exposures; one after another. The flashes would fire every time a bat broke the beam; relying on the flash duration to freeze the action was the key to successfully producing well exposed and sharp images.

Be sure to learn More about the High-speed Bat Photography Workshop HERE


Bald Eagle Workshop and Kudos

American Bald Eagle FISHING DREAMS (Hailiaeetus leucocephalus, Pygarge a tete blanche, BAEA) Kachemak Bay (near Homer), Alaska ©Christopher Dodds All Rights Reserved. Canon EOS 1DX, 300mm F2.8 L IS USM with Jobu L-Bracket  Hand Held ISO 2,000, f/2.8 @ 1/3,200s Manual mode. Click HERE to order a print or license image for publication.

He's an Eagle fishing in a rather dreamy snowfall from my Bald Eagle Workshop last March. If you would like to have the opportunity to learn the skill set to reliably get the shot timed, framed and exposed properly, then do consider joining me for the adventure of a lifetime. I'm never completely satisfied until you get the images I would be proud to call my own. Only a few seats left! For more information or to sign-up, CLICK HERE


Montreal Camera Club Northern Explorers of Light Presentation

On Monday September 9th, 2013, I had the pleasure of making my third presentation to the Montreal Camera Club; my first visit there since becoming a Canon Northern Explorer of Light.  It was truly a great evening for me to meet-up with some old and talented friends.


Last night (Sept. 9, 2013) Christopher Dodds was our guest speaker at The Montreal Camera Club's opening meeting of our 2013-14 season. The club over the years has had many guest speakers, but last night was something extra special. We had a full house and for a little over 2 hours everyone was just hanging on to every word that was spoken and in awe of every images that was shown. I can't ever remember all the people in the hall being so quiet. It is a tribute to Christopher and his speaking ability and the way he shares his knowledge of photography and the equipment he uses. It was a great evening I wish everyone could have been there.

Thank you Canon Canada for making all this possible. I am sure that I won't be the only one to tell you that you have a gem on your Canon Northern Explorer of Light team in Christopher Dodds.

Thank you once again.


John Zimmerman Past President, Montreal Camera Club

How to Stack Extenders for Mega Reach

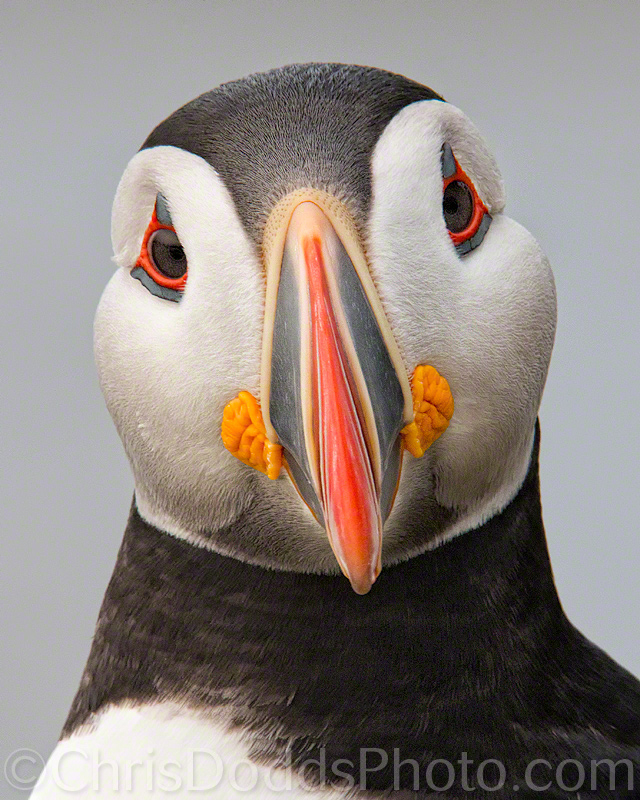
Atlantic Puffin CLOWN OF THE SEA (Fratercula arctica, Macareux moine, ATPU) Mingan Archipelago National Park Reserve of Canada, Réserve de parc national du Canada de l'Archipel-de-Mingan, Quebec, Canada. Image Copyright ©Christopher Dodds. Canon EOS Canon EOS 1DX, 600mm F4 L IS II, 2X Extender III, Canon 25mm Extension Tube II, Canon 12mm Extension Tube II, Canon 1.4X Extender III. Tripod & Jobu Jr. 3 ISO 3,200s, f/16 @ 1/200s Manual mode & manual focus. PURCHASE A PRINT or LICENSE IMAGE FOR PUBLICATION HERE.

After spending so much time with Atlantic Puffins, I've come to realize that few portraits of them truly reflect their true character. I love getting close and making portraits that truly represent my subject, in this case these comical and animated seabirds or Clowns of the sea.What do you think, did I suceed?

How to stack extenders

The idea is to use my super-telephoto 600mm f/4 IS II with both the 1.4X and 2X (version III) Extenders (or tele-converters). In order to physically connect everything together, you need to add at least an extension tube between both extenders; I use both the Canon 25 and 12mm Extension tubes (version II) connected together because they reduce the minimum focusing distance of the lens and allow me to get even closer to my subject. As far as I can tell from the images, it does not matter which order I install the extenders.


There are a few technical considerations:

  • A sturdy tripod and tripod head are required
  • Working at these extreme focal lengths so close to your subject will severely limit the depth of field, so do remember to stop-down.
  • All of this stacked equipment does cost some light, so remember to add 1 & 1/3 stop if you are shooting in manual mode.
  • Although we have some pretty amazing cameras, the only way to focus this monster is fully manual.

Bird Photography Quick Tip ANGLE OF VIEW

Razorbill VERTICAL PORTRAIT (Alca troda, petit pingouin, RAZO) Mingan Archipelago National Park Reserve of Canada, Réserve de parc national du Canada de l'Archipel-de-Mingan, Quebec, Canada. Image Copyright ©Christopher Dodds. Canon EOS Canon EOS 1DX, 600mm F4 L IS II, 2X Extender III, Canon 25mm Extension Tube II, Canon 12mm Extension Tube II, Canon 1.4X Extender III. Tripod & Jobu Jr. 3 ISO 2,500s, f/16 @ 1/250s Manual mode & manual focus. PURCHASE A PRINT or LICENSE IMAGE FOR PUBLICATION HERE.

Quick Tip

Here's a simple Razorbill portrait which also uses the same technique as described in my last post. Want to know the simplest, but most often missed trick to creating engaging and intimate portraits in nature? Simply get down to, or below, your subject's eyes; it's a simple and effective way to connect the subject to the viewer.


TESTIMONIALS


I found Chris via the strong images on his web site.
 
Having now taken two of his photo workshops, I have seen a significant improvement in my images due to improved capture and post processing techniques.  Having taken many other wildlife photo workshops, Chris stands out for his top notch instruction. His workshops provide many excellent photo opportunities.
 
If you are serious about your photography and want to get better, Chris can help you in many ways.  He is willing and able to explain what he is doing and why he is doing it.  He emphasizes not only the vision but also the execution in the field and the post processing.  
 
It was fun shooting with and learning from Chris.  I give a hearty recommendation to anyone considering a photo workshop with Chris, a recommendation I plan to follow.

Carl Zanoni Connecticut, USA


I want to thank you again for one of the best photo workshops I have ever attended.  The trip to Northern Quebec to photo Puffins was truly an adventure.  I was very impressed with the planning you put into ever aspect of the tour.  Everything ran smoothly and the opportunity to photograph these amazing birds was an experience I will not soon forget.  I also appreciate the time you spent with each of us to make sure we got the best possible result from whatever equipment we were using.  Your technique for reducing noise while maximizing detail when shooting at high ISO's was particularly helpful.  No one had ever explained the science behind this and now it makes a lot of sense.  This trip was everything I had hoped for and I look forward to joining you again in the future.

Chuck Raines Camarillo, California

Tele-compression Explained

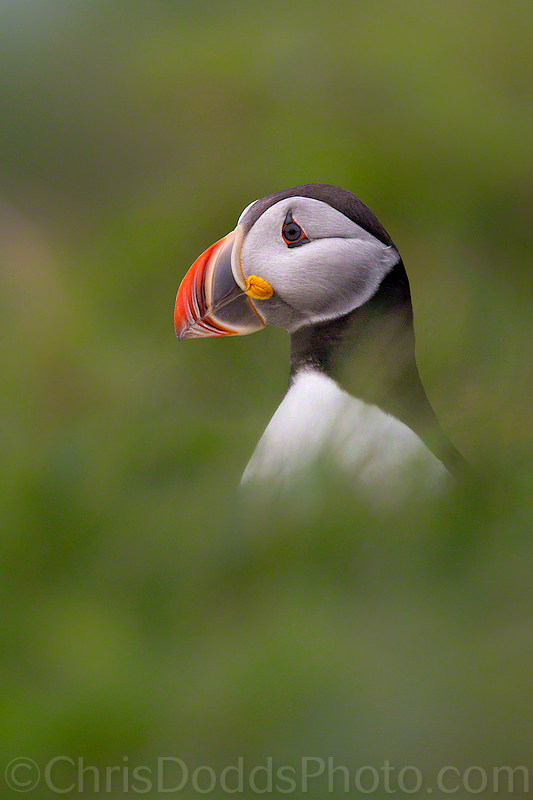
Atlantic Puffin POP-UP PUFFIN (Fratercula arctica, Macareux moine, ATPU) Mingan Archipelago National Park Reserve of Canada, Réserve de parc national du Canada de l'Archipel-de-Mingan, Quebec, Canada. Image Copyright ©Christopher Dodds. Canon EOS Canon EOS 1DX, 600mm F4 L IS II, 2X Extender III, Tripod & Jobu Jr. 3 ISO 2,000s, f/9 @ 1/1,600s Manual mode. PURCHASE A PRINT or LICENSE IMAGE FOR PUBLICATION HERE.


Here's an Atlantic Puffin from my recent Puffin Photo Tour. I love the out of focus foreground and background grass which isolate, and frame, the Puffin so well in this image. Using the super sharp 600 f/4 IS L USM II with the 2X III Extender compress those elements and helps render them so perfectly out of focus and smooth; the painterly quality I was after. The effect is known as tele-compression. At a given aperture, a telephoto lens has a smaller depth of field than a wider lens. Had I used a wider lens and got closer, then the depth of field would have been much larger, there would have been much more details in the grass and the result would have been much less appealing and much more like an average "snapshot".


TESTIMONIAL

Chris’ skills go far beyond photography.  It’s one of the reasons I enjoy working with him!  Sure, he is able to provide advice on lensing, and framing and exposure, but his lectures go far beyond this.  His knowledge of wildlife is encyclopedic!    He teaches you how to observe and reposition in anticipation of that next great shot.  And when it comes to tweaking your photos, his mastery of colour, light and texture truly becomes evident.  If you can, take one of his lectures or wilderness photography workshops.  It will help up your game!

Graham Peddie Product Strategist, Canon Canada Inc.

LensCoat RainCoat Pro2 mini-review & Black Guillemot with meal

Black Guillemot with dinner (Cepphus grille, Guillemot à miroir, BLGU) Mingan Archipelago National Park Reserve of Canada, Réserve de parc national du Canada de l'Archipel-de-Mingan, Quebec, Canada. Image Copyright ©Christopher Dodds. Canon EOS Canon EOS 1DX, 600mm F4 L IS II, 2X Extender III, Tripod & Jobu Jr. 3 ISO 3,200s, f/9 @ 1/2,000s Manual mode. PURCHASE A PRINT or LICENSE IMAGE FOR PUBLICATION HERE.

Getting close enough for head shots of Black Guillemots was a ton of fun each morning during my Atlantic Puffins & more workshop. We had a few hick-ups with wind and waves which forced us to evacuate the island early on the first two days, but we all came away with some great images. I would be eternally grateful if anyone can help identify this fish or eel.


LensCoat® RainCoat 2 Pro

Canadian Nature Photographer Christopher Dodds using LensCoat RainCoat Pro 2 in South Texas. Image Copyright & courtesy Jory Griesman (thanks, Jory!) Canon S-95 in Program mode.

Mini Review: I have been using my new LensCoat RainCoat Pro 2 since I first started to test it in April. I was using a very complex raincoat that required a dedicated eyepiece for each camera body and became quite a nuance to use; it was bulky and the clear window often fogged-up after placing my wet hand inside the cover. Changing tele-converters or adding extension tubes was nearly impossible with the rain cover physically attached to the camera via the dedicated eyepiece. It did the job and was the best I used until discovering the LensCoat RainCoat Pro2.

Installation of the
LensCoat RainCoat Pro2 is a breeze and being able to quickly flip the cover out of the way when adding, or changing, extension tubes or tele-converters (Extenders) is a huge selling point. The whole deal takes just about 10 seconds for me to install, folds into a small pouch and makes the whole process much simpler and appealing to use - even when I would skip the complex set-up of my old cover during light drizzle. I must admit that I am also thrilled with the design with the added foldaway left sleeve which makes it easier to keep your left hand on the lens and focus manually; both "sleeves" are long enough to slide over your rain jacket's arms to keep water out of your elbow when standing in the rain all day.

Finally a rain cover for my camera that is easy to use, keeps my gear dry and doesn't interfere with camera function or operator dexterity!

Description from the LensCoat site: LensCoat® RainCoat 2 provides protection for your camera and lens from the elements like rain, snow, salt spray, dirt, sand and dust while allowing you easy access to the camera and lens controls. It has all same great features as the original RainCoat but adds an additional integrated pocket with foldaway arm sleeve on the left side for easier access to zoom and focus. The RainCoat 2 comes in two sizes Pro (for DSLRs with lenses from 200-400/300mm 2.8 - 800mm) and Standard (for DSLRs with small lenses up to 100-400/400mm f5.6). The RainCoat 2 is constructed from a lightweight waterproof, breathable poly tricot material. Available in Black, Green, Navy, Realtree® Max4, Realtree AP Snow, Digital Camo, and Forest Green camouflage pattern. The seams are tape sealed for maximum protection. NO dedicated eyepiece required. The RainCoat 2 goes on quickly and easily. Its versatility through the use of the cinch straps allows you to adjust the length of the cover and to keep it snug around your lens. It has 2 fold out arm sleeves from its integrated pockets for access to the camera and lens controls. You can also access the camera through the rear opening and the lens through the hook & loop bottom closure.

Please support this site and order yours by clicking on the banner below.
 

Leaderboard_728x90_v1.jpg