 Snowy Owl Bubo scandiacus (Harfang des neiges) Casselman, Ontario. Image Copyright ©Christopher Dodds www.chrisdoddsphoto.com All Rights Reserved. Canon EOS 1DsMKII, 500mm F4 IS ISO 400, F5.6 1/1600s Manual mode. Full Frame. The chart below (in the cloudy bright column) shows the correct exposure to be ISO 400 F/11 @ 1/400s. I chose to stop the action by using a higher shutter speed, so I used the equivalent exposure of ISO 400 F/5.6 @ 1/1600 second. I also knew to expect less detail in the snow and white feathers, because there are no shadows to help define them.
“What you shooting at there, Dodds?” echoed across the landscape as I set-up to photograph Snow Geese and Sandhill Cranes in New Mexico about a year ago. “What exposure you at Dodds?” was the question asked by the same gifted photographer just recently. I don’t want to embarrass anyone, so I won’t mention any names here. I truly do think that he is a gifted and talented photographer. He’s widely published and is also the first person to admit that he doesn't really know all the “techie” stuff.....and he was much closer to my exposure this year, than last.
The single most important skill a photographer should have is a basic understanding of the fundamentals of photography. The most important tool, and the least understood aspect of photography is exposure theory. I learned photography with a totally manual camera and used slide film (seems like so long ago), so a basic understanding was necessary to make successful images.
Q: Why bother when I can just keep things simple and take a picture, check the histogram and make any adjustments necessary?
A: Because having an intimate knowledge of exposure theory and your cameras functions and controls helps you grow and improve as a photographer, make better decisions and better images as a result.
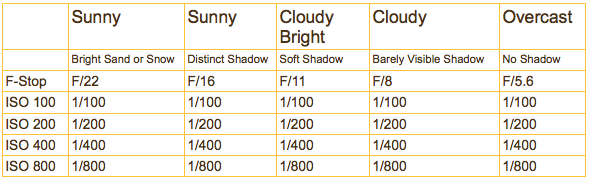
In it’s simplest form, the Sunny 16 rule (or Sunny F/16 rule) states: On a bright, sunny day, the correct exposure for any middle tone subject is F/16 at the shutter speed nearest to the reciprocal of the film speed. For example:
ISO 100 = 1/100 second @ F/16
ISO 200 = 1/200 second @ F/16
ISO 400 = 1/400 second @ F/16
ISO 800 = 1/800 second @ F/16
Now we have established the correct exposure, it’s time to decide if we need more depth of field or shutter speed. Each step up, or down, of one variable represents a doubling, or halving, of any other variable. If you need more shutter speed than 1/100 second @ F/16 (ISO 100), then an equivalent exposure would be ISO 100 1/1600 second @ F/4.

This chart illustrates the equivalent exposures for ISO 100 and 200. Each setting above will allow the same amount of light to fall on your digital cameras sensor, or film cameras film. The exposure is the same, with the only difference being either your shutter speed (to freeze or blur action) or the depth of field (very narrow to blur the background, or very large to capture an entire grand landscape sharp).
But wait! It got cloudy. Now what? The Sunny F/16 rule is actually the correct ambient exposure for an average subject under bright sunny conditions. If the sun goes behind a cloud, then the light falling onto your subject is decreased and you must make an adjustment to your basic exposure settings. Here are some aperture settings for some different daylight situations:
This is intended as a starting point, so there are exceptions. Backlight or sidelight both require adjustments to reach the correct exposure. It’s a good idea to expose to the right with your digital camera; 50% of the recorded data is recorded on the right fifth (or 20%) of your digital cameras histogram. With very light subjects in very bright conditions, I routinely subtract light so as not to clip the highlights. With very dark or black subjects, I tend to add light to maximize the recorded detail. Notice the technicals for the Snowy Owl in my previous post; ISO 200 F9 1/1600 second = ISO 200 F22 1/1250 second (or Sunny F/16 rule for light sand or snow) minus 1/3 stop to preserve all of the details in the whites without clipping (or loosing) any data.
Sounds complicated, but if you spend some time digesting and thinking about everything here; you'll be able to get that once in a lifetime shot accurately and consistently with confidence. Not to mention how much you will impress the boys (or girls) when you are all standing around waiting for the shot or talking shop.
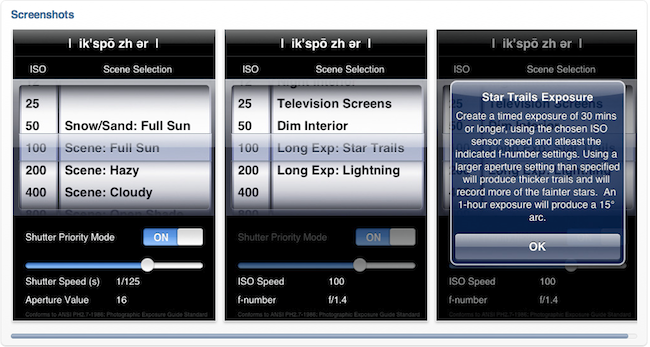 If you own an iPhone or iPod touch, there's a great application available for $1.99 called Exposure Calc. I just found it while writing this blog entry and think it is a great learning aid and pocket reference.
If you don't get it, and need to take a test shot, check the histogram, make adjustments, take another test shot; that's okay too, as long as you're having fun and making the odd good image to keep you interested.
Comments welcome & appreciated.
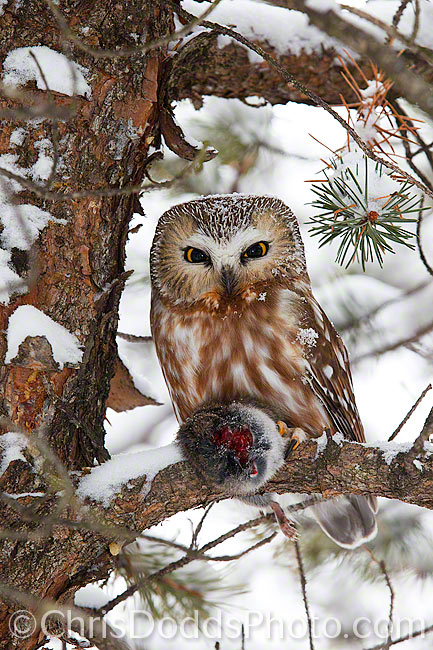 Northern Saw-Whet Owl (Aegolius acadicus, Petite Nyctale) with sprinkle of snow and Meadow Vole (Field Mouse) Lunch. Ontario. Image Copyright ©Christopher Dodds All Rights Reserved. Canon EOS-1D MKIV, 70-200 F2.8 IS II @180mm. ISO 800, 1/100s F8 Manual. Hand held.580EXII Flash manual mode. Full Frame. CLICK HERE TO PURCHASE A PRINT or LICENSE IMAGE FOR PUBLICATION.
 Northern Saw-Whet Owl (Aegolius acadicus, Petite Nyctale) Portrait. Ontario. Image Copyright ©Christopher Dodds All Rights Reserved. Canon EOS-1D MKIV, 70-200 F2.8 IS II @200mm with 1.4X Teleconverter. ISO 800, 1/80s F7.1 Manual. Hand held. Full Frame. CLICK HERE TO PURCHASE A PRINT or LICENSE IMAGE FOR PUBLICATION.